Laravel — 使用Swagger 產出API文件
後端人員開發完API之後,必須撰寫API文件,才能快速地提供給別人使用,讓開發人員知道如何使用你開發好的API。
而Swagger這個開源的項目讓我們可以很快速的完成這個工作,快速產出精美的API文件。


Laravel + Swagger
在Laravel的項目中,要撰寫Swagger的API文件,我們可以不需要了解他原本API的JSON格式寫法。
透過 DarkaOnLine/L5-Swagger 這個別人封裝好的Laravel 套件,我們只需要使用Swagger讀得懂的annotations,就可以讓Swagger產出一份完整的API文件。
透過 DarkaOnLine/L5-Swagger 這個別人封裝好的Laravel 套件,我們只需要使用Swagger讀得懂的annotations,就可以讓Swagger產出一份完整的API文件。
Installation
安裝 DarkaOnLine/L5-Swagger:
$ composer require “darkaonline/l5-swagger”
你可以在此找到你使用的Laravel版本相應的套件版本:
安裝完之後我們可以將 L5-Swagger 的 config 與 view 檔案 publish 到我們的專案裡:
$ php artisan vendor:publish --provider "L5Swagger\L5SwaggerServiceProvider"
Laravel ≤ 5.5 的版本需要手動註冊ServiceProvider,如果你的Laravel ≥ 5.5可以略過此步驟:
打開你的
AppServiceProvider在 app/Providers裡,加入:$ this->app->register(\L5Swagger\L5SwaggerServiceProvider::class);
或打開你的
config/app.php:在 providers區塊裡加入:L5Swagger\L5SwaggerServiceProvider::class,
然後你可以透過瀏覽
/api/documentation存取你的API文件,相關設定可以透過 config/l5-swagger.php設定,詳細的設定方法在此篇先不贅述。Usage
接下來我們需要撰寫Swagger的annotations,讓套件可以讀取我們寫的annotations產生JSON或YAML format的檔案,產生出API文件。
我們可以將描述檔寫在:
- 你的API Controller的function上
- 開個Docs的資料夾,將描述檔放在資料夾裡的檔案裡
將描述檔寫在API Controller的function上的好處是,在你修改api的同時也可以快速的找到相對應的描述檔並修正維護,但樣會造成Controller裡面有很多描述檔的註解,讓Controller很雜亂。
而在Docs裡開檔案撰寫API文件的好處則是方便管理,也可以將針對同一類型的資源以檔案分類,而在專案的管理上,我們也可以很直白的透過資料夾名稱了解這個資料夾的功能(針對API的說明文件)。
在這裡我們採取第2個做法。
設定Info
首先我們需要先建立
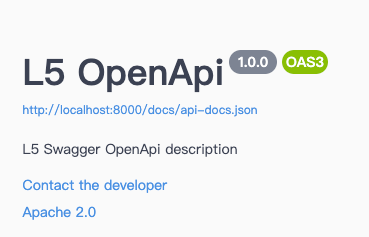
app/Docs/Info.php:// app/Docs/Info.php <?php/*** @OA\Info(* version="1.0.0",* title="L5 OpenApi",* description="L5 Swagger OpenApi description",* @OA\Contact(* email="developer@example.com"* ),* @OA\License(* name="Apache 2.0",* url="http://www.apache.org/licenses/LICENSE-2.0.html"* )* )*/
先在
api/Docs/Info.php裡設定關於你API文件的資訊。
設定API Server
Swagger有個方便的功能,我們可以直接在我們的API文件頁面上測試我們開發好的API(像Postman那樣的工具)。
建立
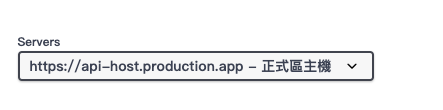
app/Docs/Server.php:// app/Docs/Server.php<?php/*** @OA\server(* url = "https://api-host.dev.app",* description="測試區主機"* )* @OA\server(* url = "https://api-host.production.app",* description="正式區主機"* )* @OA\server(* url = "http://localhost",* description="Localhost"* )*/
我們在這支檔案裡定義可以使用的host server。
根據你選擇的server,你在使用API文件頁面測試你的API的時候,他會發起Request到你選擇的Server。
根據你選擇的server,你在使用API文件頁面測試你的API的時候,他會發起Request到你選擇的Server。

撰寫API描述檔
接下來我們撰寫開發的API文件描述檔。
假設我們有以下幾支API:
// routes/api.php
<?php//取的文章列表
Route::get('articles', 'ArticleController@list'); //取得文章內容
Route::get('articles/{id}', 'ArticleController@show');//新增文章
Route::post('articles', 'ArticleController@store'); //更新文章
Route::patch('articles/{id}', 'ArticleController@update');//刪除文章
Route::delete('articles/{id}', 'ArticleController@destroy');
建立
app/Docs/route.php:取得文章列表:
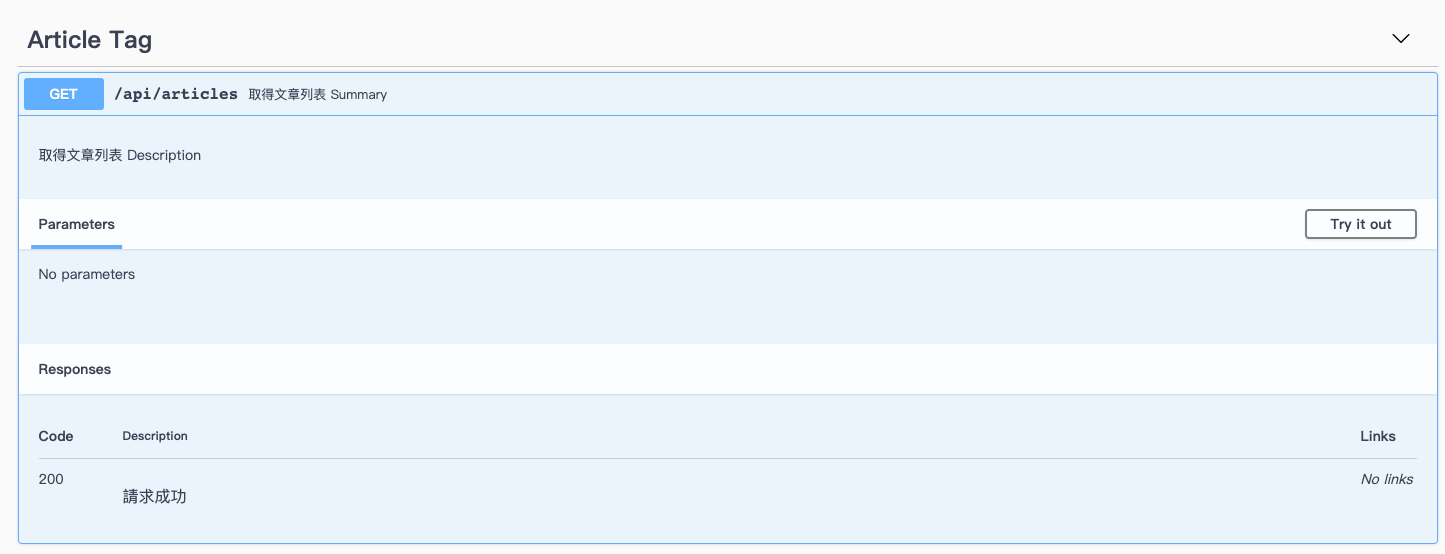
//.../*** @OA\Get(* path="/api/articles",* operationId="articles",* tags={"Article Tag"},* summary="取得文章列表 Summary",* description="取得文章列表 Description",* @OA\Response(* response=200,* description="請求成功"* )* )* Returns list of articles*/

取得文章詳情:
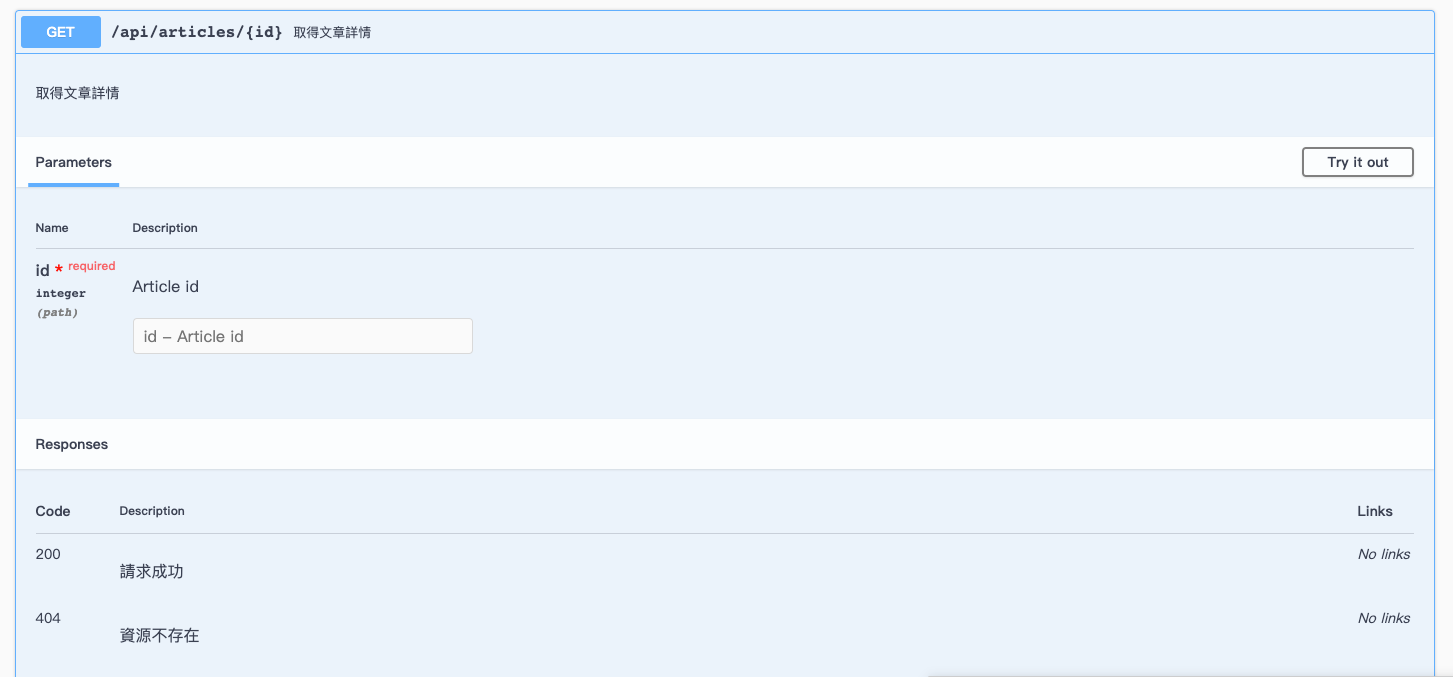
//.../*** @OA\Get(* path="/api/articles/{id}",* operationId="articleShow",* tags={"Article"},* summary="取得文章詳情",* description="取得文章詳情",* @OA\Parameter(* name="id",* description="Article id",* required=true,* in="path",* @OA\Schema(* type="integer"* )* ),* @OA\Response(* response=200,* description="請求成功"* ),* @OA\Response(* response=404,* description="資源不存在"* )* )* Show article content*/

其中的
operationId參數是文件頁面點擊展開的Html id attribute,如果設定重複的話,當點撃了該區塊,所有重複id的區塊都會展開。新增文章:
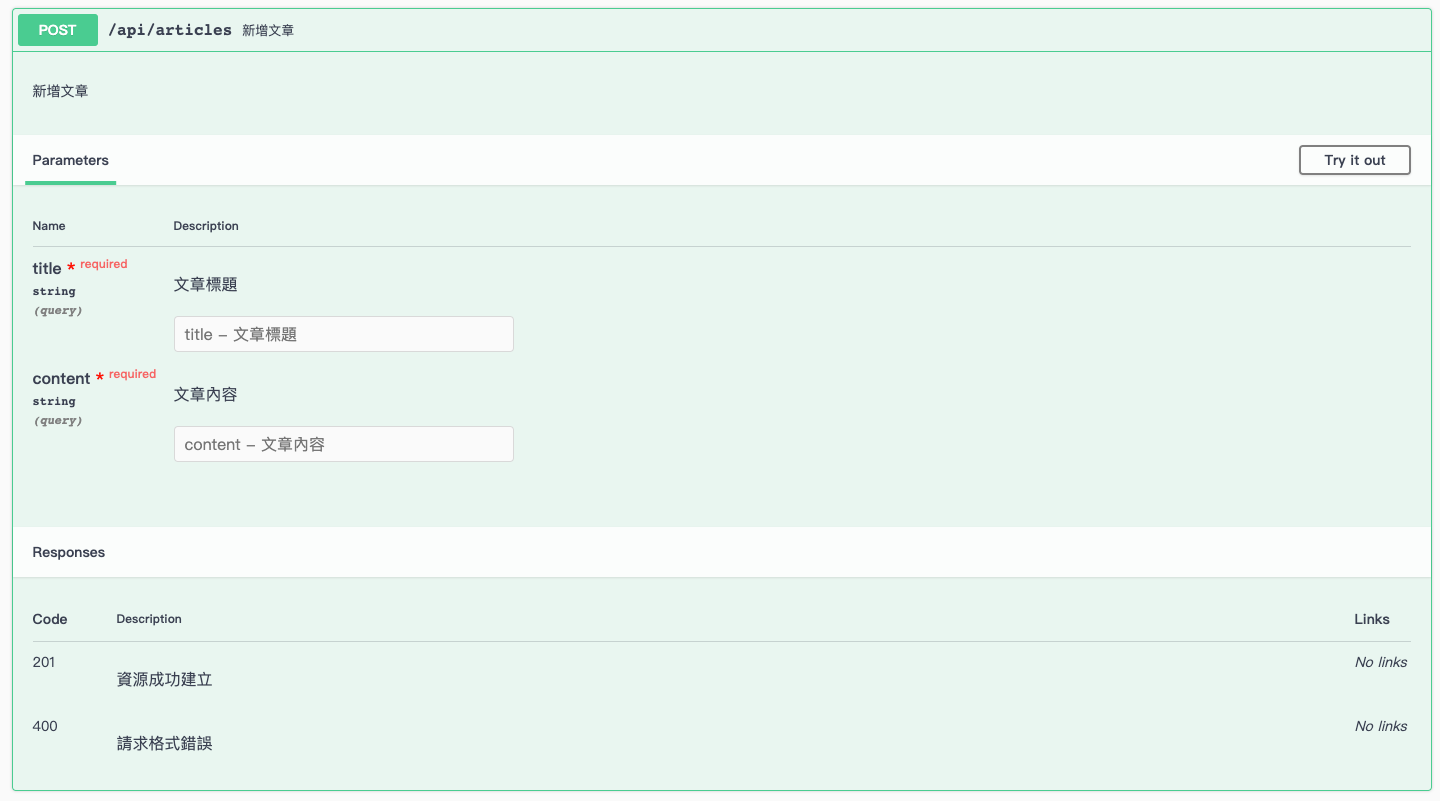
//.../*** @OA\Post(* path="/api/articles",* operationId="articleStore",* tags={"Article"},* summary="新增文章",* description="新增文章",* @OA\Parameter(* name="title",* description="文章標題",* required=true,* in="query",* @OA\Schema(* type="string"* )* ),* @OA\Parameter(* name="content",* description="文章內容",* required=true,* in="query",* @OA\Schema(* type="string"* )* ),* @OA\Response(* response=201,* description="資源成功建立"* ),* @OA\Response(* response=400,* description="請求格式錯誤"* )* )* Create a article*/

更新文章:
//.../*** @OA\Patch(* path="/api/articles/{id}",* operationId="articleUpdate",* tags={"Article"},* summary="更新文章",* description="更新文章",* @OA\Parameter(* name="id",* description="Article id",* required=true,* in="path",* @OA\Schema(* type="integer"* )* ),* @OA\Parameter(* name="title",* description="文章標題",* required=false,* in="query",* @OA\Schema(* type="string"* )* ),* @OA\Parameter(* name="content",* description="文章內容",* required=false,* in="query",* @OA\Schema(* type="string"* )* ),* @OA\Response(* response=200,* description="請求成功"* ),* @OA\Response(* response=404,* description="資源不存在"* )* )* Update article content*/
刪除文章:
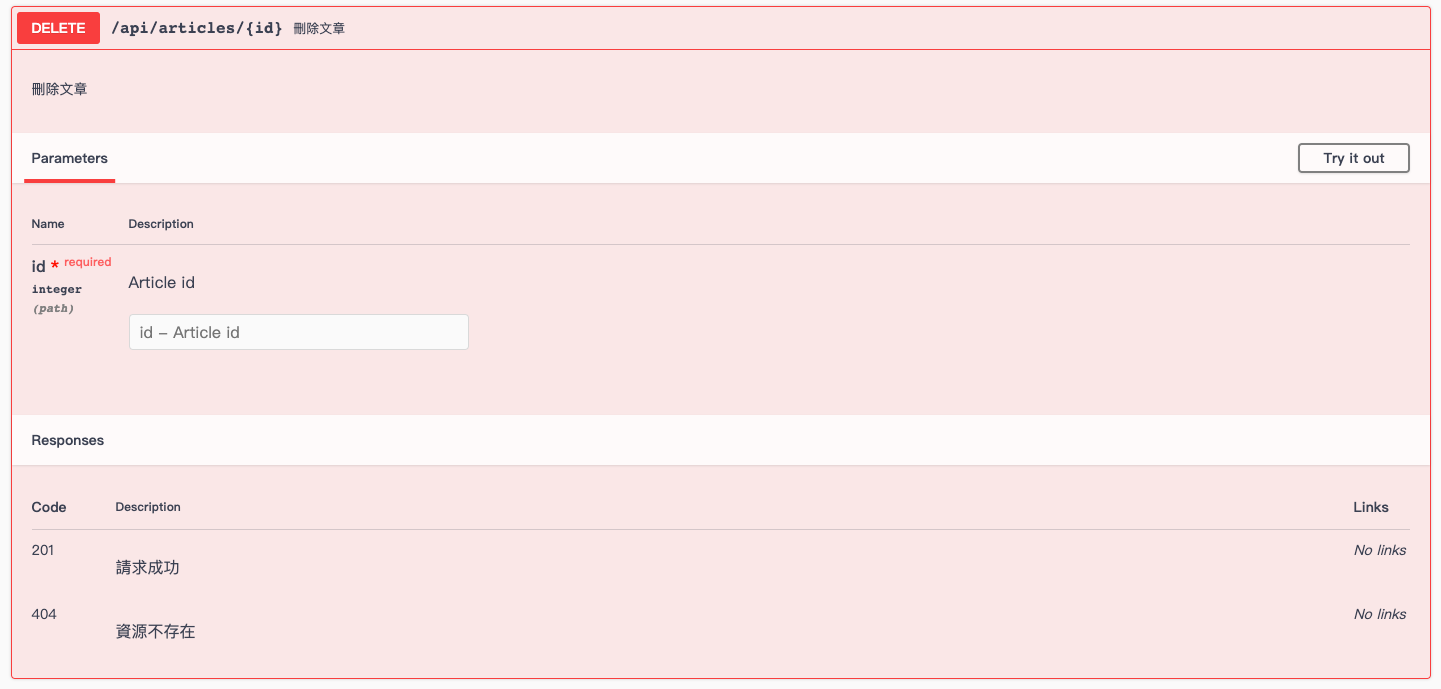
//.../*** @OA\Delete(* path="/api/articles/{id}",* operationId="articleDelete",* tags={"Article"},* summary="刪除文章",* description="刪除文章",* @OA\Parameter(* name="id",* description="Article id",* required=true,* in="path",* @OA\Schema(* type="integer"* )* ),* @OA\Response(* response=201,* description="請求成功"* ),* @OA\Response(* response=404,* description="資源不存在"* )* )* Delete article content*/

這樣子我們就大致上完成我們的API文件的描述檔了。
產生API文件
接下來我們需要透過我們的描述檔產生API文件,使用指令:
$ php artisan l5-swagger:generate
在撰寫階段,也可以在
.env設定參數,讓進入頁面的時候,都重新編譯一次描述檔案:// .env//...L5_SWAGGER_GENERATE_ALWAYS=true
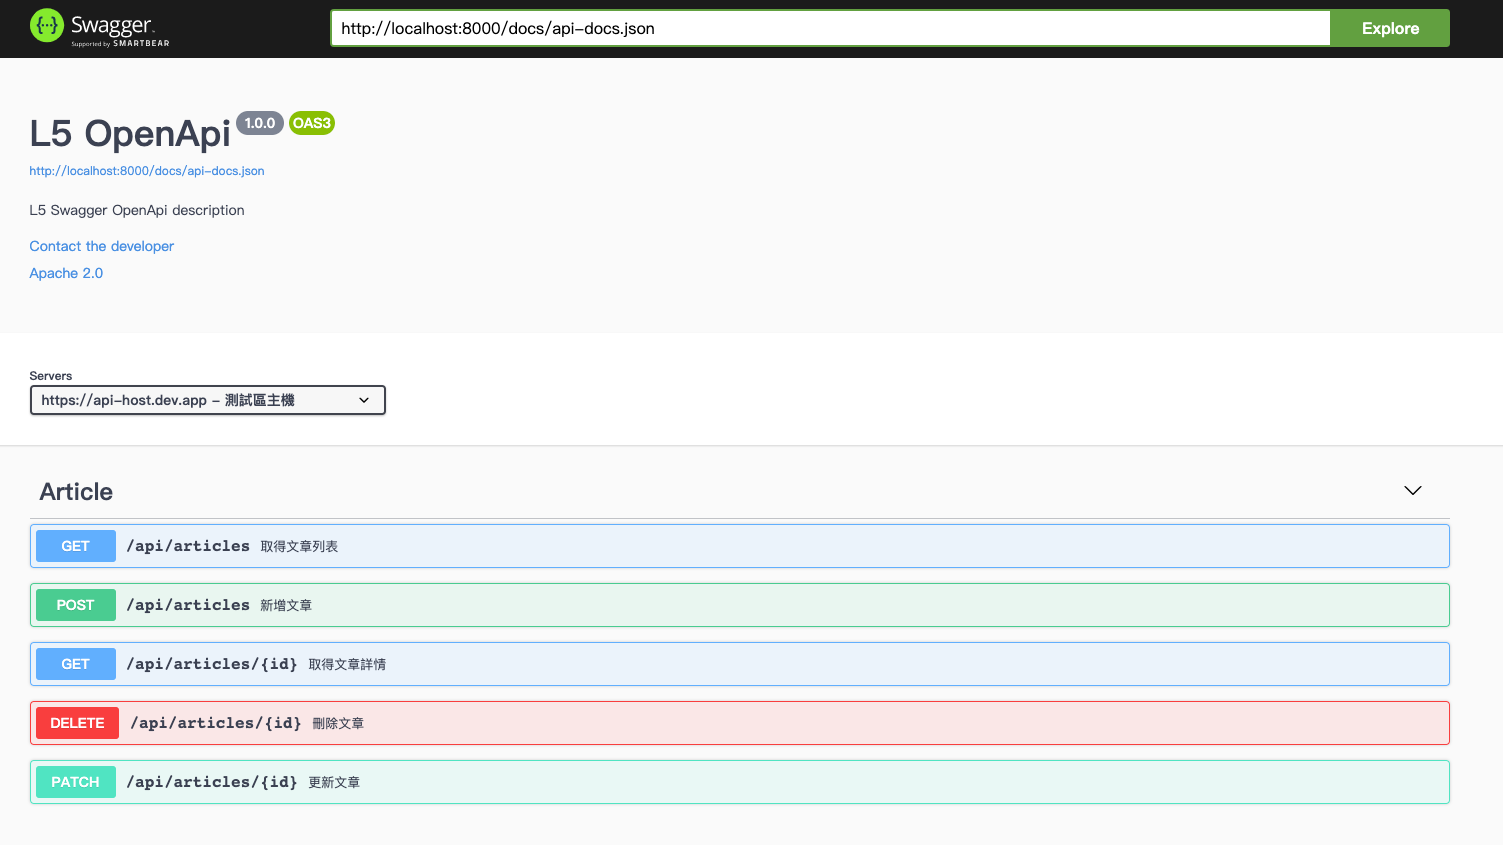
產出後結果如下:

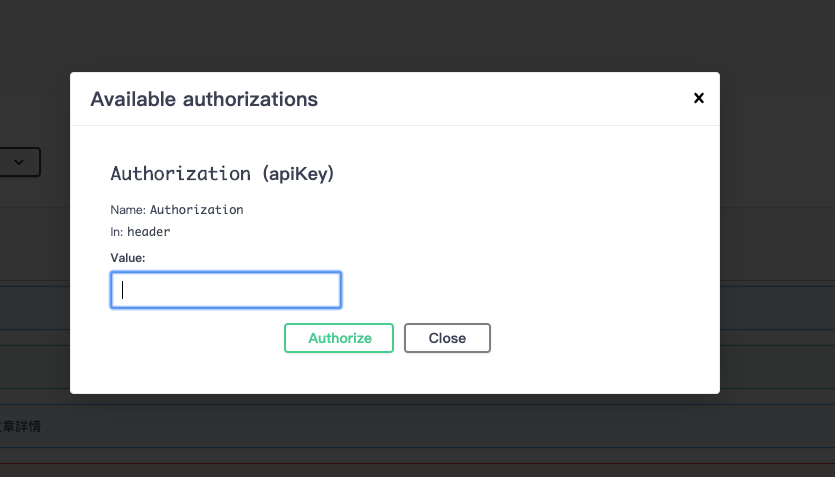
如果你的API需要驗證身份的話只需要在描述檔上加上驗證的參數即可
// app/Docs/Security.php/*** @OA\SecurityScheme(* securityScheme="Authorization",* type="apiKey",* in="header",* name="Authorization"* )*/
然後在你需要驗證的API描述檔底下加上
security的選項設定//.../*** @OA\Post(* path="/api/articles",* operationId="articleStore",* tags={"Article"},* summary="新增文章",* description="新增文章",* security={* {* "Authorization": {}* }* },* @OA\Parameter(* name="title",* description="文章標題",* required=true,* in="query",* @OA\Schema(* type="string"* )* ),* @OA\Parameter(* name="content",* description="文章內容",* required=true,* in="query",* @OA\Schema(* type="string"* )* ),* @OA\Response(* response=201,* description="資源成功建立"* ),* @OA\Response(* response=400,* description="請求格式錯誤"* )* )* Create a article*/


到這裡我們的API文件範例就差不多完成了,感謝大家看到這裡,更多其他細節與用法我們就下次再聊吧。

留言
張貼留言